Configure types and status sets
Types and Status Sets are the structural backbone of a Strategy Hub workspace. A Type is a level in your Strategic Item hierarchy—Strategy, Objective, Key Result, KPI—and a Status Set is the ordered list of Statuses the Items at that level move through. Both are managed by an Admin under Settings, and most workspaces configure them once during setup and revisit them rarely. Strategy Hub installs with a starter set already in place, so you are usually adjusting what’s there rather than building from scratch.
When to configure this#
Reach for these settings when the structure or the vocabulary stops matching how your organization works:
- You want to rename a level—“Goal” instead of “Objective”—or change its icon or color.
- You are introducing a new level, such as an Initiative between Objective and Key Result.
- The Statuses don’t match your reporting language, and you’d rather read “Off Track” than “At Risk” on a pill.
- A level should track progress a different way—rolling up from its children instead of a number someone types in.
Types#
A Type is one level in the hierarchy. Open Settings → Types to see them all and to add, rename, or rearrange them.
The Type hierarchy#
The Types screen lays out every Type by level, top to bottom. Drag a Type between levels to change where it sits. Use Children on a parent Type to choose which Types are allowed beneath it—that constraint is what keeps the hierarchy valid, so the Create and Parent pickers only ever offer Types the structure permits. Create type adds a new level.
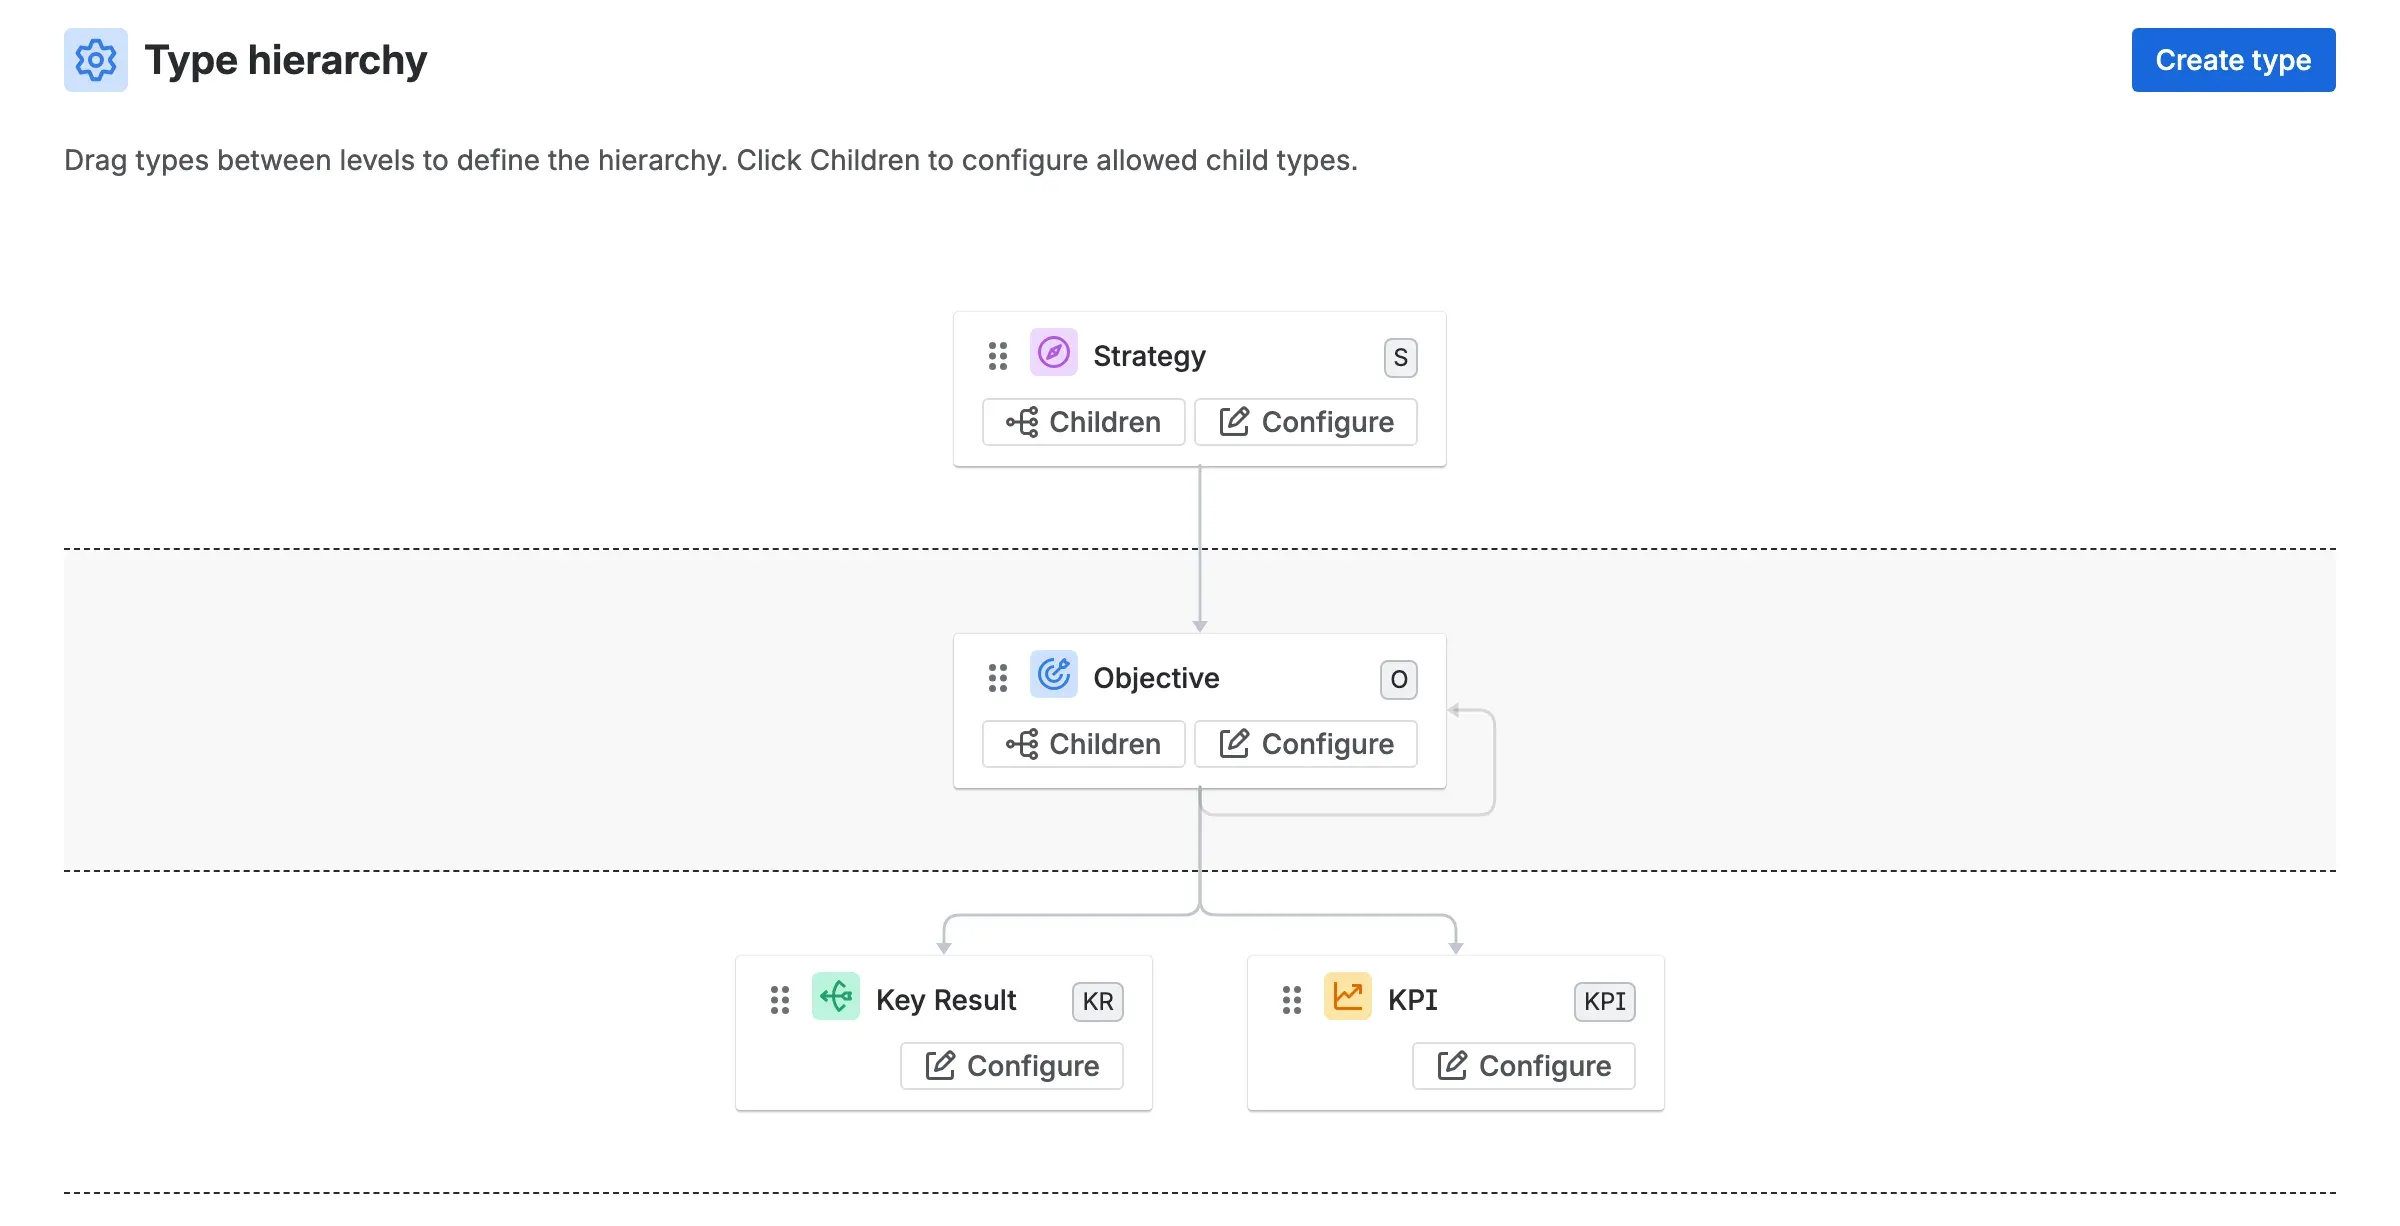
- Key prefix — the short code that mints Item keys for this Type, shown beside its name.
- Children — sets which Types are allowed directly beneath this one.
- Configure — opens the Type’s full settings.
What each Type controls#
Configure on a Type opens its settings. A Type carries:
- Name and key prefix — the prefix mints Item keys like
OBJ-1. The name is editable at any time. The prefix is fixed once the Type exists, because Items already carry keys built from it. - Icon and color — the chip you see on every Item of this Type.
- Status set — which set of Statuses Items of this Type may use (more below).
- Progress tracking — which value-update modes Items of this Type may pick (manual, nested items, or linked work items) and which one is the default.
- Status update mode — whether Items update their Status manually, automatically, or either way, and which is the default.
- Cadence — how long an Item of this Type may go without a manual update before it counts as stale. Only a manual update resets that clock.
The progress and Status options here set the menu; an Owner then picks from it per Item. See Statuses and progress for what each mode does.
Status Sets#
Open Settings → Statuses to manage Statuses in two layers: the shared pool of Statuses, and the sets that arrange them.
Statuses live in one place#
Every Status—its name, color, and category—is defined once in a shared list, then reused across as many sets as you like. Define “On Track” once and it is the same “On Track” everywhere. Each Status lists the sets it is used in, so you can see its reach before you edit or remove it.
A Status’s name is yours to set. The category beneath it is one of four fixed system categories—Not started, Healthy, Not healthy, and Done—and that category, not the name, is what Strategy Hub reasons about. See Statuses and progress.
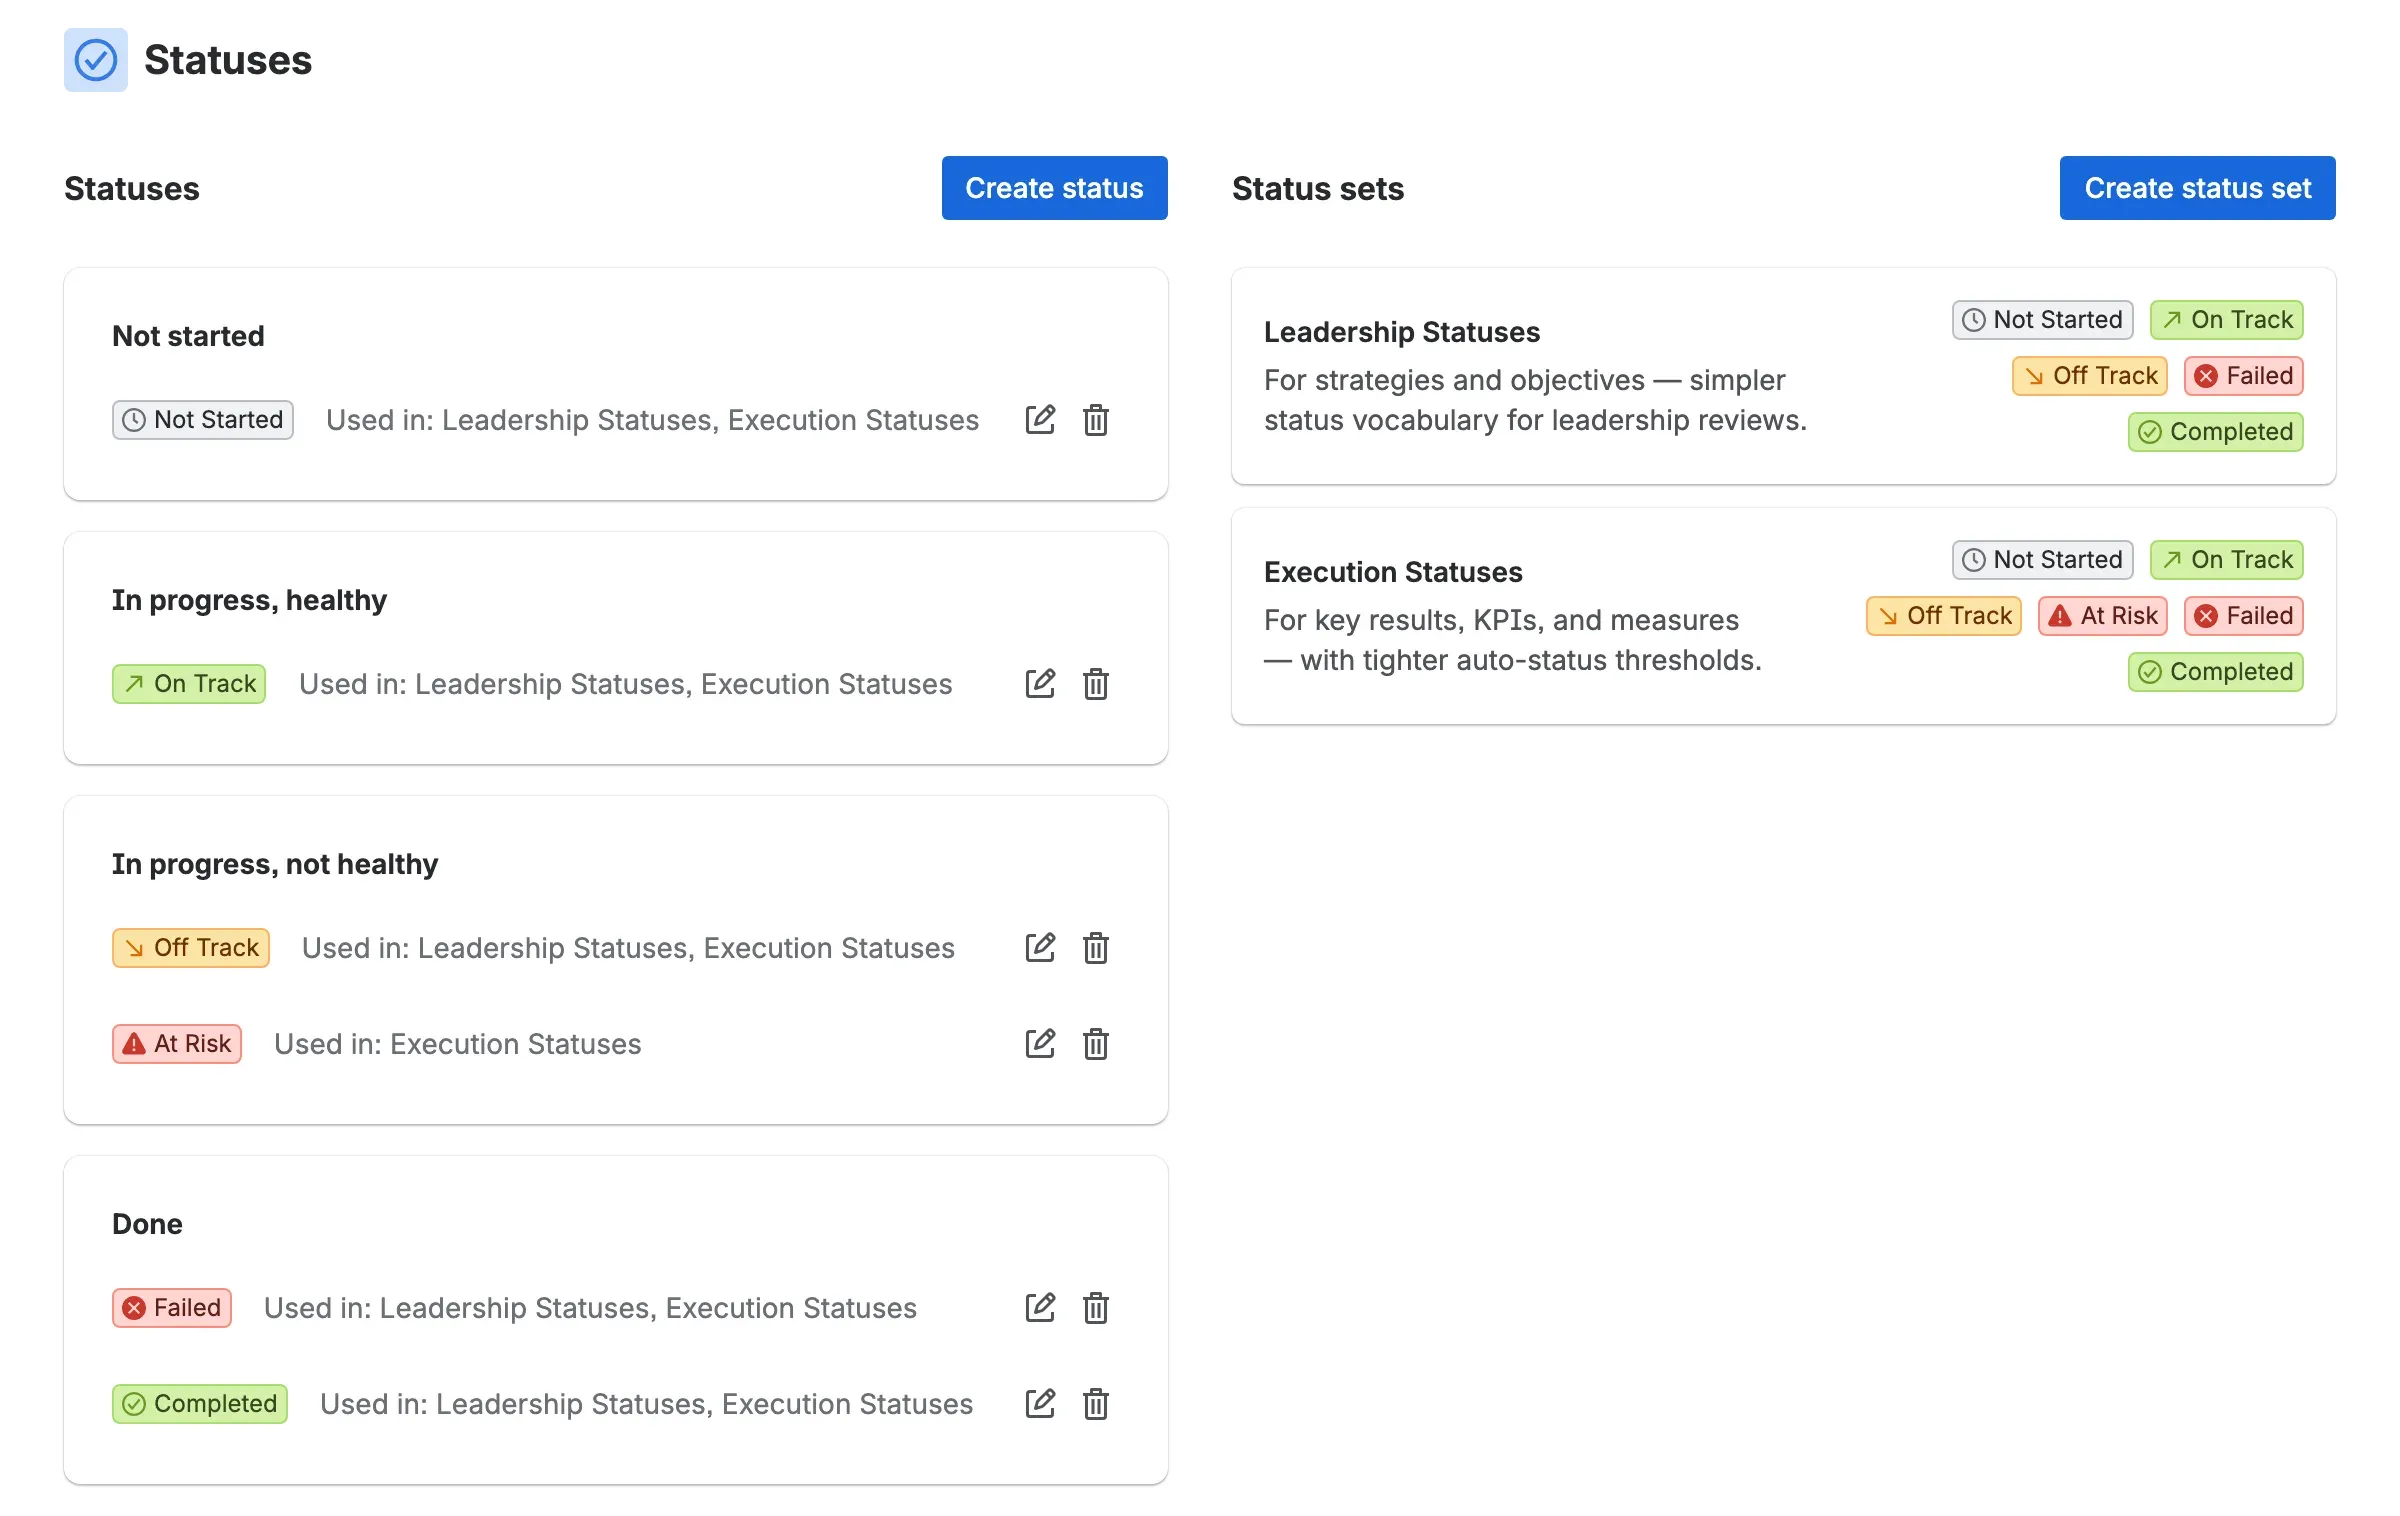
- Statuses — the shared pool. Each Status is defined once and reused.
- Status Sets — named collections that arrange Statuses into an order and a workflow.
Building a Status Set#
A Status Set gives a name, a description, and an ordered list of Statuses to the Items at one or more levels. Open a set to:
- Name it and describe what it is for—“For strategies and objectives” reads better in a picker than “Set 2”.
- Add Statuses from the shared list and drag them into the order Items should move through.
- Lay out the status workflow—the progress segments that map a value to a Status when a Type updates automatically, plus the starting, completed, and failed Statuses for the edges. The mechanics live in Statuses and progress → Auto-status and pace.
A set’s Used by panel lists the Types that point to it, so you always know who depends on a set before you change it.
Tip — workspaces usually keep two sets: a simpler one for high-level Items like Strategies and Objectives, and a tighter one for execution-level Items like Key Results and KPIs.
Editing safely#
Most edits are safe and take effect everywhere at once—rename a Type, recolor a Status, reword a description, and every Item updates immediately. A few changes need more care:
- A Type’s key prefix can’t change once the Type exists. Pick it deliberately at creation.
- Removing a Status from a set, or deleting a set a Type still uses, affects live Items. Check the set’s Used by panel first.
- Deleting a Status, a set, or a Type asks you to confirm before it applies.
This structure changes rarely for a reason: every view, rollup, and Insight is built on it. When you do change it, expect the change to ripple across the whole workspace.
Related#
- Statuses and progress — what the Status categories, update modes, and status workflow you configure here actually do.
- Strategic Items — where the Types, Statuses, and update modes you set up appear for everyone.
- Jira integration — story-points and priority weighting for linked-work rollups are configured under Settings → Jira.